Kitchen project
Kitchen Cupboard Project
Before & After
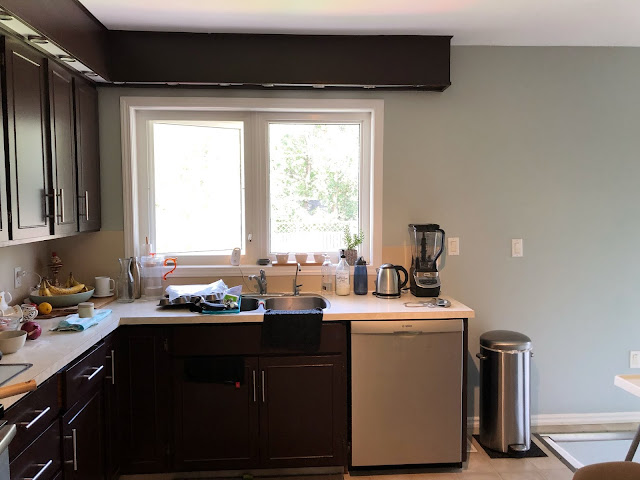
We kind of have a unique little kitchen space in our house... as in not ideal? But it works. It's a separate room tucked around the corner with not a lot of counter space but room for a table nook.
I knew when we bought our house that I would want to tackle the kitchen sooner than later - let us not forget that it was painted Red when we moved in. I don't have a picture but the walls were painted RED.
So the walls were first. I also wanted to paint or strip the cupboards. I found out from some chipping under the paint that they were quite a nice wood tone under the dark brown. I opted for stripping them instead of painting them. In hindsight that may have been the easier route, but here we are.
I was duly warned by a few trusted DIY'ers that kitchen cupboards are no small task & they were right. This wasn't hard, but was quite laborious to strip. Then I did touchups with stain.
It took me roughly six months to piece-meal, including plenty of "on hold" gaps, but I finally finished!
Anyway, here's the "Before" with the dark brown paint (minus red paint!)
Next I painted the top border white as well as the backsplash.
Here's the other side of the kitchen below with the nook area, where we typically eat breakfast & lunch,
& use the dining room for suppers.
We brought up the little coffee cupboard from the kitchen downstairs.
here's "After" . . .
a lighter wood grain than the dark brown & opted for some open shelving.
& on the other side -
went with white to try to blend the cupboards, added some shelving to the left, & found the bench at a garage sale in town.
Still some more painting I'd like to do around here but feels nice to have this hefty project finished & happy our kitchen feels quite a bit brighter.


Oh Dan what a lovely job you’ve done! So homey. Great choices 👌🏼
ReplyDeleteBIG job! congrats on a beautiful finish and a space that you enjoy! Like the coffee nook with shelving and the open shelf option too.
ReplyDelete